If you cannot get a special effect in the camera, then you must create the visual effect in post production. With major motion pictures, each shot can cost thousands of dollars. But for low budget filmmakers, there are cheaper alternatives. Do you want to start doing amazing special effects with your small DV Camcorder? Then you have at least two options: Matte Paintings and Budget Green Screen Shooting.
Budget Green Screen Shooting
Green screen is one way of adding beautiful backgrounds to live action shots. Probably the most extreme example of this is Robert Rodrigues' Shark Boy and Lava Girl. But even if you are shooting with only a DV camcorder, you can do inexpensive green screen shots. One can cut the cost of the shot substantially by doing your green screen shooting outdoors using a themonuclear device (the sun) which is free (on sunny days). This means that all you have to hire is the green screen itself - none of the finely calibrated even lighting that's normally so essential for the computer to get a good key on the other end. As an alternative to purchase or rental, one can manufacture a green screen. Commercial lighting supply houses sell paints specially manufactured for the purpose, but it is probably possible to get by with an ordinary house paint chosen carefully to be "green enough" for the computer to pull a key. The most common difficulties with green-screen are: getting even lighting on the screen. getting the lighting on the foreground to match the lighting of the (separately shot) background. By shooting outside, with a diffusion frame hung over the shot you will get naturally even sun-light all over the screen and actor. This will also match the daylight conditions of the background that later replaces the green. If your intended background is not going to be normal daylight, or if you get a lot of cloud movement, this may not work for you. Make sure your foreground actor is a good distance from the screen, so you don't get even a hint of green light reflected back onto him/her, as this will create problems later - but with your light source being the sun (overhead), you're less likely to get green spill than if the lights were hitting the screen from the front, as they probably would in a studio.
Front Projection
Front Projection (often abbreviated FP) is a technique which can achieve the same result as green screen, but "in camera," that is to say, the composition of subject and background is complete as the combined image is acquired by the camera. The technique uses a beamsplitter located in front of the camera in such a way as to completely fill the camera's field of view, and oriented at a precise 45 degrees to the camera's shooting axis. (This rotation from the normal may be left-right or up-down.) The other components to the system are a transparency projector (still or motion picture), and a special retro-reflective lenticular screen positioned behind the action. A beamsplitter acts as both mirror and window, reflecting a portion of the incident light, and reflecting another portion. Beamsplitters are chosen for a specific application based on the ratio of reflectance to transmission. Common types are 50R/50T (50% reflectance, 50% transmission) and 70R/30T. The beamsplitters used in Front Projection cinematography are of the plate type, simply a piece of plate glass with a special coating on one side designed to reduce the amount of light absorbed by the beamsplitter, and consequently neither reflected nor transmitted. The coated side faces the action, and is referred to as the "front" surface. The purpose of this coating is to reduce the loss of light due to absorption by the beamsplitter, which serves only to heat the glass. A retroreflective screen is set behind the actors and other set pieces. This screen is not just a typical diffusive projection screen, which disperses light evenly so that a large audience composed of people sitting at many different angles to the screen sees a uniformly bright image. Instead, the retroreflective screen tends to send light right back where it came from. The classic material for retroreflective FP screens is a made by 3M, and sold under the trademarked name of "Scotchlite". Scotchlite is used in signmaking and conspicuity applications (nighttime motor vehicle safety visibility). It is available from commercial signmaking supply houses. Retroreflection in Scotchlite is achieved using millions of microscopic glass beads suspended in a transparent substrate bound to opaque vinyl sheeting. It is available in rolls of up to four feet in width. While constructing the large (40 feet by 100 feet) screen of Scotchlite for the film 2001: A Space Odyssey, director Stanley Kubrick and special effects supervisor Tom Howard initially laid strips of Scotchlite side by side, but found that variations in manufacturing made the seams between adjacent strips glaringly obvious in the final product. Their solution involved tearing the Scotchlite into irregular overlapping pieces, minimizing the occurrence of variations of retroreflectivity large and regular enough to be discernable to the audience. Still, as Martin Hart has observed, careful examination of the FP scenes of 2001 reveal flaws introduced by variations in retroreflectivity between adjacent random patches. A more sophisticated solution was presented in an SMTPE paper: a review of this paper will be presented in a near future version of this article. Having discussed the nature of the physical components used in Front Projection, we turn to the preparation and arrangement of these components in a working FP system. A still or motion picture transparency projector containing the desired background image, or "matte," is placed so that the projection axis is perpendicular to the camera's shooting axis, meeting at the place where the camera's shooting axis touches the front surface of the beamsplitter. (Thus the beamsplitter's orientation is 45 degrees to both camera and projector.) When the projector is operating, the background matte is projected onto the front surface of the beamsplitter. A portion of the image is transmitted through the beamsplitter. In ordinary applications, the transmitted part of the image is absorbed by a black surface on the side of the beamsplitter opposite the projector, to avoid stray reflections. The portion of the image which is not transmitted or absorbed by the beamsplitter is reflected through an angle of 90 degrees, and consequently projected over the action along the camera's shooting axis, falling onto both foreground actors and objects as well as the retroreflective screen behind them. Retroreflective materials tend to reflect light back along the path of incidence. In FP work, the background plate image is retroreflected, back toward the beamsplitter. Part of the retroreflected background image is again lost, as it is either absorbed by the beamsplitter or reflected back into the projection lens. The remainder enters the camera where it is photographed along with the action. The only portion of the image not accounted for in the foregoing discussion is that part of the projected background matte which falls on the actors or other foreground subjects. Foreground lighting, combined with the extreme deficit in retroreflectivity of the foreground subjects in comparison to the special screen, mean that the part of the projected image which falls on the actors is so dim as to not be detectable in-camera. Precise alignment of system components is required to make sure that foreground objects perfectly cover their own shadows, cast by the projector on the screen. This rules panning and tilting, except in the special case where the camera is mounted so that either panning, tilting, or both occurs around the rear nodal point of the camera lens: so called "nodal pans" and "nodal tilts." In addition, the beamsplitter must be large enough, and the camera close enough, so that the camera does not take the edge of the beamsplitter into view. Examples of nodal pan-and-tilt camera work in the context of FP can be seen in the "Dawn of Man" sequence in the film 2001: A Space Odyssey (1968), particularly the watering hole scenes. (The front projection effects on 2001 were executed by Stanley Kubrick with assistance from Tom Howard.) A change of focal length (zoom) does not present the same difficulty as do panning or tilting. The camera can zoom in or out as long as the edges of the beamsplitter (or of the projected matte image) are not in view at the widest point of the zoom. In 2001, Kubrick also used large set pieces at either end of some FP shots in such a way as to hide the edges of his already-gigantic retroreflective screen. In fact, a special and inventive application of zooming was used by Zoran Perisic, who worked as a rostrum or animation stand cameraman on 2001, to enhance the FP process for the film Superman: The Movie (1978). Electronically controlled motorized zoom lenses are placed on both camera and projector, and synchronized with one another so that both lenses zoom together and at the same focal length at all times. This means that the background image will not change its apparent size when the camera zooms in, as the projector simultaneously projects a reduced image. In Persic's phrase, the projector zooms and the camera zooms to "embrace" the smaller image. However, the zoom causes foreground objects to appear to rush toward or away from the camera. The combination of the "static" background and the "moving" foreground enabled the visually effective flying scenes which helped to make the film a success. To enhance this effect still further, the use of FP in Superman introduced two other innovations: use of travelling mattes (using a motion picture projector instead of a still transparency projector, in order to project a moving background); and the mounting of the entire front projection rig (camera, projector, and beamsplitter) on a large motion-controlled robotic-arm with six degrees of freedom, and using a massive curved screen. As in the use of travelling mattes in rear projection process photography, the projector's shutter must be synchronized with the camera's using mechanical or electronic means, in order to avoid background flicker. The motion-controlled front-projection mount was a masterpiece of engineering for 1978, and used an early microprocessor for control. Every aspect of the rig's operation and motion could be recorded to computer tape for later automatic playback, causing the rig to move and operate exactly as trained.
Matte Paintings
The oldest and probably the most underrated visual effect is matte paintings. We see these all the time but because they look so natural, we don't notice. Originally, matte paintings was done on glass that stood directly in front of the camera. To do matte painting, a partial set is created which is only as big as the actors and only extends to where the actors will perform. The rest of the movie set is empty space (or something that you don't want to be seen in the movie.) Except for a tiny spot of the glass which is clear, the rest of the movie set is painting on the glass. This allows you to add more scenery buildings as paintings. As long as the actors can be seen through the clear space of the glass, you cannot tell that the actors are not apart of the painted movie set. Today, matte paintings are done with both paint and with CG (computer generated visual effects). Rather than filmed through glass, the actors are filmed normally and later composited into the matte painting. Therefore, now the distiction between matte paintings and computer generated visual effects is blurred. If the actors are filmed on a partial movie set (without any green screen, etc.) then the effect is a matte painting... even if you use computer generated effects to get the effect.
3D Animation for Visual Effects
When you start looking at the possibility of using 3D computer generated effects, you need understand the different types of 3D animation. 1. General Purpose Animation Programs such as LightWave, Maya, and 3D Studio Max are general purpose animation programs. They are very powerful, expensive, have steep learning curves and are used on most high end effects movies. 2. Special Purpose Animation Programs Program such as Vue, Bryce, Poser, and DAZ Studio are designed for a specific purpose. Vue and Bryce are designed to create realistic scenery from nature. Poser and DAZ Studio are designed to work with special computer models called Poser figures or Digital Puppets. Some of these programs are even free such as DAZ Studio and Bryce. 3. Special software Plug-ins Software modules such as Character Studio work inside of a general purpose animation program to create a special kind of animation similar to a Special Purpose Animation Program. LightWave, Maya, and 3D Studio Max can be greatly expanded through the use of plug-in modules. 4. Support Programs Programs that add in the animation but do not actually do any rendering can be extremely useful when you have a general purpose animation program which would be more awkward to use for a special task. These expand the power of LightWave, Maya, and 3D Studio Max without making these programs too cumbersome.
3D Modeling
All elements in 3D animation must be modeled. Programs such as LightWave, Maya, and 3D Studio Max come with a modeler module built in. Programs such as Vue, Bryce, Poser, and DAZ Studio do not but in the case of Poser and DAZ Studio, you can buy hundreds of figures designed for these programs.
3D Animation
Animation is done in three parts, the modeling, the actual animation and the rendering. The actual animation can be:
1. Keyframe animation Each movement is entered into the computer system by noteing the position of objects at specific frames or points in time. The movement between these key points is then calculated by the animation program based on rules set up by the animator (straight line, curved, etc.)
2. Programmed animation For a flock of birds, rather than record the position and movement of each bird, a computer program calculates where all the birds go and how they move.
keying in combustion
1. Start by creating a Composite by opening your greenscreen and backplate footage in
Combustion.

2. Within that composite, go to File > New Composite.
3. Make sure your settings for the New Composite match the settings for the existing
composite:

4. In your Workspace panel, you should now see your new composite above your original:
5. Right-click on the new composite and choose "Import Footage" and bring in the same
greenscreen footage you did the first time:

6. Right-click on the duplicate greenscreen layer and choose Operators > Color Correction >
Brightness/Contrast; which will add this operator to your dupe layer:
Brightness/Contrast; which will add this operator to your dupe layer:

7. These are the settings I used in my Brightness/Contrast operator, though they may vary
depending on the quality and brightness of your greenscreen:
8. Double-click on your original composite to make sure that's what you're viewing in your
view panel:
depending on the quality and brightness of your greenscreen:
8. Double-click on your original composite to make sure that's what you're viewing in your
view panel:

9. Add a Discreet Keyer to your original greenscreen layer and go to the Set Up module in
the Keyer Controls. Look for the "Key In" section and click on the button next to "Source":
the Keyer Controls. Look for the "Key In" section and click on the button next to "Source":

10. In the resulting dialog box, select the Brightness/Contrast operator and click OK:

11. Make sure you set your Keyer Controls to "Result" and that your Brightness/Contrast
operator appears in the button next to Source: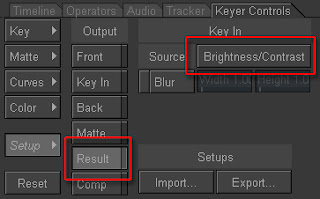
operator appears in the button next to Source:

From here, you should start working with the Keyer to pull your matte. This will vary from
shot to shot so I can't exactly walk you through that process. Remember, that my settings in
the Brightness/Contrast operator were based on the fact that the greenscreen was over lit.
You'll have to adjust your settings depending on how the greenscreen was captured in your
footage.
shot to shot so I can't exactly walk you through that process. Remember, that my settings in
the Brightness/Contrast operator were based on the fact that the greenscreen was over lit.
You'll have to adjust your settings depending on how the greenscreen was captured in your
footage.
THE MOVIE MISTAKE MAGIC
IN BIG HOLLYWOOD MOVIES WE CAN SEE THE VFX CASE STUDY WERE WE CAN CORRECT DURING OUR SHOOT.
Here we can go through some of the faults.


TRACKING OVERVIEW
Like 2D trackers, 3D trackers rarely if ever use colour information. "Chroma is relatively unimportant to boujou's feature tracker," says 2d3's Steve Hill. "Pre-processing the images rarely improves the tracking results and we generally discourage pre-processing of any kind because of the many adverse effects that it cause. The exceptions are reducing the image size to reduce the effects of motion blur, and tweaking the linearisation settings of very dark cineon images to bring out more detail in the shadows."
 |
Digital Domain's Doug Noble points out that their approach is very much that of modelling the environment from a highly accurate recording of on-set measurements. They aim to not so much give the 3D artist a camera track set of data points, but rather to "track the room to the camera" so the artist has a set with the camera moving through it. Noble's TRACK software now usese optical flow and a range of solutions including Laser scans or "poor man's LIDAR" (LIght Detection And Ranging).
3D tracking falls into two classes, automatic trackers and manual trackers. Many programs do both. Sci-d-vis' Rolf Schneider, notes that "3D Equalizer has 3 different (manual) tracking modes: pattern, marker and edge/corner. The marker tracking mode is specialized on unicolored, flat discs placed on an unicolored background. 3D Equalizer computes the 'center of mass' of the disc which becomes the tracking point, on a frame by frame basis. That means that no previous frames are needed during the tracking process so no error accumulation happens. Marker tracking is very precise, but specialized. The cross/cheque patterns can be tracked quite well by regular 'pattern' trackers, that's the reason why people like to use them."
 |
 |
- Mmake sure tracking confidence is 70 to 80 percent green for all points. Bi-directional tracking can be repeated from a lower confidence area that looks right in the point centred window. Repeating this will result in longer high confidence sections.
- Delete keyframes for sections that deteriorate into yellow and red confidence levels.
- Using smart update behaviour in the options section can improve the chances of good tracks with points that change shape through rotation or lighting.
- Make sure the Ready to solve graph is all green for the frames you want to track.
- Before solving, point blast all point tracks to check for mistakes that are not detected by the tracker. One of these can completely ruin the Solve.
- Do the solving in the manual stages and look at the pixel slip numbers as you go. If you aren't getting a good solve, pointblast the tracking points again and correct any wandering points.
HOW TO MAKE A SHOW REEL?
A show reel is vital in this industry. It helps you expand your client base, show new techniques, gain a better job and raises your profile, yet many people starting out still produce poor reels. So what does it take to make a great show reel ? The basic ingedients are common sense - but it is often hard to show self control and objectivity when you look at your own work. Here are 10 tips when you're doing your reel.
1. Packaging
Not perhaps the first thing you would think of, but it is the first thing someone sees. You would be amazed how many people do not have good presenation and most importantly their name and contact details clearly shown on the front, and side spline of a show reel. It is commercial suicide to not have your name and contact details permanently attached on both the cover and on the tape or DVD. Over the years we have actually been sent reels were we could not find the phone number of the compositor to ring them. In several cases they only included their details on the covering letter, in one case their phone number and email was only on a post-it note attached to the VHS - and I swear one guy only had it at the end of the actual tape after 10 seconds of black. Not only are your name and contact details vital but so is presentation, for two key reasons. First, the reviewer will use the packaging as a quality clue to the sort of work you do. The very style of the design will frame the viewing of the material - rightly or wrongly. If you're after a design position, presentation is naturally vital, but even if your not, a hand written label speaks volumes about your attention to detail and your attitude to your own work, "if he/she can't even be bothered with their OWN work - how will they deal with my project ?". The second reason is the desktop clutter of the person your sending the tape to. Anyone who professionally looks at show reels - looks at LOTS of show reels. You need your reel to leave an impression but also to be able to be found again should a job or project come up, "where was that reel of that new compositor... it had a sort of funky lime green label and a big,... ahh there it is". Hard as it is to accept, - whoever you're sending your reel to has a lot of other things on their mind - other than remembering all your details and where they left your reel. Make the packaging professional and distinctive. Do not use the labels of the tape house who ran you off 15 VHS, - the reel will blend in with 100 other animatics, offlines and client review tapes in their office and you'll never hear from them again.
 2. Be clear about what position you're after
What position do you really want, if you can't answer that then no one will hire you as anything but a runner. I once got a reel from a guy who "specialized in 2D, 3D, design, animation, special effects and compositing", - and worse, his cover letter said his skills covered, "Flame, Maya, Softimage, After Effects, Photoshop, Illustrator, Henry, AVID and HTML web authoring". This might impress your friends but post houses don't hire generalists, they hire specialists, of course it helps if that specialist has a wide knowledge. So make it clear what position you want. If you want to be an animator call yourself one, if you want to be a compositor - say so right up front, do not claim to be a colourist, who composites their own character animation from their own motion capture data, for characters they design using charcoal and sometimes clay. It may well be that you are a modern genius but you need to approach people as an expert in one area, or at the very least someone passionate about learning a particular craft, and never - ever - write you want to direct. The scene you need to imagine is a bunch of people sitting around an office and someone saying, we really need an X, and someone else saying - "hey I have maybe just the guy, - I got their reel the other day - this is right up their alley - they would be perfect for that". If you can't articulate that position - the one you'd be perfect for - then you can't make a reel that shows your the right person for that job. People do not say - and trust me on this - "this guy is multi-talented - knows everything and we should just have him round the office to work on anything that comes up".
3. Play the reel first
If you are meeting to show your reel, show it early, and let the work speak. If you play the reel it will give you something to talk to and discuss after it is finished, but avoid the desire to talk over every shot, people will normally stop watching your work and turn to hear whatever your saying - not what you want. Also avoid the desire to grab the remote and pause, rewind and fast forward. It is likely that much of your work is new to the person your talking to, give them a moment to take it in. You know it backwards but no one else does. If it is not clear what you have done (since your work is so seamless) - then edit in a section of before & afters or print out some high quality stills showing what you had to work with. These can be great to talk to and discuss and much more friendly than jumping up and down and pointing at the screen with the remote.
4. Put your best material first
All show reels are watched with one finger hovering over the fast forward button, you job is to so knock them out with your first set of images that they put the remote control down and sit forward to watch more closely. Forget building to a climax - you have one chance: the first 5 - 10 seconds, after that they will either be watching it or scanning their desks for the next reel. This is why montages are great at the start of reels - immediate and quick visuals to signal a range of work and a reason to keep watching. Montages are not without their flaws, but so long as the editing is not too quick and the quality of the work sustains it, a montage is a good idea. The exception to this is directors or character animators. In both cases the viewer is looking for story telling and thus a montage works against showing you can tell a story. I would recommend selecting music that isn't too fast - so the images have time to breath, and also music you like. You'll see this reel alot and if your cringing as your reel starts it can send the wrong signal.
5. Don't point out faults
If you're present when your reel is played, you'll know every problem - every fault - but just shut up. Constantly we see people put on a reel and almost immediately say, "oh this was a horror of a job, - the director made me grade it like that, those matte edges were not my fault - if we'd been given more time we could have..." Shut up. Be proud of your work and only if they comment or ask should you make a brief comment, do not get side tracked into canning the director, the agency or the client - chances are the person your sitting with is their best friend and if not, you just look unprofessional.
6. Make it consistent
Do not show loads of character animation and a logo design, if you want to be a compositor. Show a reel that backs up the image of the position your after. You might have 30 great wire removals but they are not relevant if you want a job doing broadcast design.
7. Keep it short
Please.
8. By all means, try anything innovative
If you have a great idea for your reel - so long as its done well - include it . Sometimes a clever idea can make a reel stand out. Perhaps it is a graphical device, like the countdown, or a graphical theme you repeat throughout the reel. It might even be a piece you shoot yourself as a 5 sec intro or a 15 sec closer. It was once said that if you write a personal CV list one really odd thing at the end under personal interests, like "my interests include skiing, movies and underwater football". - The theory is that later people will say "oh yeah the underwater football guy"... similarly you might composite 12 versions of yourself packing up the studio - leaving and turning out the lights at the end of the reel, or a cute intro piece direct to camera to open - but make sure it is professional quality, - if it looks amateurish, dump it.
9. Do not start your reel with space footage or space ships unless you're ILM
Come to think of it ILM doesn't lead with spaceships... Every major facility will have done major space shots, unless your work is exceptional beyond Star Wars and then some, forget it. It is tempting to want to show the sort of work that company is famous for, and to a point this is relevant but it can so easily backfire, I know of designers who have been offended to see their work copied on someone elses reel. Try and show relevant material but not a copy of their house style - originality is rewarded, so is a range of work. I once sat looking at a reel of an animtor who only animated dolphins. That's it. If I wanted an animated Dolphin - I should call him - otherwise he wasn't interested. It is desirable to know as much as you can about the company your sending the reel to - or meeting with, but genuine original work, and a good attitude are the most vital.
10. Be honest
Do not claim to have done work you didn't do. I once used a freelancer to do a small amount of particles - we were full up - so we outsourced this one element, a year later this guy sat with in a director's office and explained that they had done the whole job - everything - himself, - this director let him go on for 5 minutes and then cut him off by commenting that it was funny but when he was personally directing this spot he never met this guy... needless to say that cut the meeting short. Never claim to have done work you didn't and don't claim to know things you don't, people can sense these lies a mile away and you'll never be trusted again. I once had a guy tell me he knew everything - I mean everything about particles in flame, as we were in the flame suite I innocently spun around and started building a set up in action and invited him to explain further. He went white and confessed that actually he'd seen it demoed once and not much more, - to this day I feel badly for the guy - but that is what happens.
One last point if you have the resources -- log every reel that goes out. Note on paper or in a database what was on that reel, - when you call that client back a year later and someone says that they think they already have your reel - you'll be able to explain that while the reel they have has X, Y and Z on it - it does not have A & B - which your really keen to show them, - this will impress them as you remember exactly what you gave them so well and it will allow you to re visit and remind them of your skills and talents. If you keep an accurate history reel, you can easily make new reels- if you don't then putting a reel together can be a nightmere of lost audio tracks, half finished tests and missed opportunities.
Every reel is different but the best ones are simple, stick in your head and are easy to find on your desk a week later.
Good luck.
1. Packaging
Not perhaps the first thing you would think of, but it is the first thing someone sees. You would be amazed how many people do not have good presenation and most importantly their name and contact details clearly shown on the front, and side spline of a show reel. It is commercial suicide to not have your name and contact details permanently attached on both the cover and on the tape or DVD. Over the years we have actually been sent reels were we could not find the phone number of the compositor to ring them. In several cases they only included their details on the covering letter, in one case their phone number and email was only on a post-it note attached to the VHS - and I swear one guy only had it at the end of the actual tape after 10 seconds of black. Not only are your name and contact details vital but so is presentation, for two key reasons. First, the reviewer will use the packaging as a quality clue to the sort of work you do. The very style of the design will frame the viewing of the material - rightly or wrongly. If you're after a design position, presentation is naturally vital, but even if your not, a hand written label speaks volumes about your attention to detail and your attitude to your own work, "if he/she can't even be bothered with their OWN work - how will they deal with my project ?". The second reason is the desktop clutter of the person your sending the tape to. Anyone who professionally looks at show reels - looks at LOTS of show reels. You need your reel to leave an impression but also to be able to be found again should a job or project come up, "where was that reel of that new compositor... it had a sort of funky lime green label and a big,... ahh there it is". Hard as it is to accept, - whoever you're sending your reel to has a lot of other things on their mind - other than remembering all your details and where they left your reel. Make the packaging professional and distinctive. Do not use the labels of the tape house who ran you off 15 VHS, - the reel will blend in with 100 other animatics, offlines and client review tapes in their office and you'll never hear from them again.
What position do you really want, if you can't answer that then no one will hire you as anything but a runner. I once got a reel from a guy who "specialized in 2D, 3D, design, animation, special effects and compositing", - and worse, his cover letter said his skills covered, "Flame, Maya, Softimage, After Effects, Photoshop, Illustrator, Henry, AVID and HTML web authoring". This might impress your friends but post houses don't hire generalists, they hire specialists, of course it helps if that specialist has a wide knowledge. So make it clear what position you want. If you want to be an animator call yourself one, if you want to be a compositor - say so right up front, do not claim to be a colourist, who composites their own character animation from their own motion capture data, for characters they design using charcoal and sometimes clay. It may well be that you are a modern genius but you need to approach people as an expert in one area, or at the very least someone passionate about learning a particular craft, and never - ever - write you want to direct. The scene you need to imagine is a bunch of people sitting around an office and someone saying, we really need an X, and someone else saying - "hey I have maybe just the guy, - I got their reel the other day - this is right up their alley - they would be perfect for that". If you can't articulate that position - the one you'd be perfect for - then you can't make a reel that shows your the right person for that job. People do not say - and trust me on this - "this guy is multi-talented - knows everything and we should just have him round the office to work on anything that comes up".
3. Play the reel first
If you are meeting to show your reel, show it early, and let the work speak. If you play the reel it will give you something to talk to and discuss after it is finished, but avoid the desire to talk over every shot, people will normally stop watching your work and turn to hear whatever your saying - not what you want. Also avoid the desire to grab the remote and pause, rewind and fast forward. It is likely that much of your work is new to the person your talking to, give them a moment to take it in. You know it backwards but no one else does. If it is not clear what you have done (since your work is so seamless) - then edit in a section of before & afters or print out some high quality stills showing what you had to work with. These can be great to talk to and discuss and much more friendly than jumping up and down and pointing at the screen with the remote.
4. Put your best material first
All show reels are watched with one finger hovering over the fast forward button, you job is to so knock them out with your first set of images that they put the remote control down and sit forward to watch more closely. Forget building to a climax - you have one chance: the first 5 - 10 seconds, after that they will either be watching it or scanning their desks for the next reel. This is why montages are great at the start of reels - immediate and quick visuals to signal a range of work and a reason to keep watching. Montages are not without their flaws, but so long as the editing is not too quick and the quality of the work sustains it, a montage is a good idea. The exception to this is directors or character animators. In both cases the viewer is looking for story telling and thus a montage works against showing you can tell a story. I would recommend selecting music that isn't too fast - so the images have time to breath, and also music you like. You'll see this reel alot and if your cringing as your reel starts it can send the wrong signal.
5. Don't point out faults
If you're present when your reel is played, you'll know every problem - every fault - but just shut up. Constantly we see people put on a reel and almost immediately say, "oh this was a horror of a job, - the director made me grade it like that, those matte edges were not my fault - if we'd been given more time we could have..." Shut up. Be proud of your work and only if they comment or ask should you make a brief comment, do not get side tracked into canning the director, the agency or the client - chances are the person your sitting with is their best friend and if not, you just look unprofessional.
6. Make it consistent
Do not show loads of character animation and a logo design, if you want to be a compositor. Show a reel that backs up the image of the position your after. You might have 30 great wire removals but they are not relevant if you want a job doing broadcast design.
7. Keep it short
Please.
8. By all means, try anything innovative
If you have a great idea for your reel - so long as its done well - include it . Sometimes a clever idea can make a reel stand out. Perhaps it is a graphical device, like the countdown, or a graphical theme you repeat throughout the reel. It might even be a piece you shoot yourself as a 5 sec intro or a 15 sec closer. It was once said that if you write a personal CV list one really odd thing at the end under personal interests, like "my interests include skiing, movies and underwater football". - The theory is that later people will say "oh yeah the underwater football guy"... similarly you might composite 12 versions of yourself packing up the studio - leaving and turning out the lights at the end of the reel, or a cute intro piece direct to camera to open - but make sure it is professional quality, - if it looks amateurish, dump it.
9. Do not start your reel with space footage or space ships unless you're ILM
Come to think of it ILM doesn't lead with spaceships... Every major facility will have done major space shots, unless your work is exceptional beyond Star Wars and then some, forget it. It is tempting to want to show the sort of work that company is famous for, and to a point this is relevant but it can so easily backfire, I know of designers who have been offended to see their work copied on someone elses reel. Try and show relevant material but not a copy of their house style - originality is rewarded, so is a range of work. I once sat looking at a reel of an animtor who only animated dolphins. That's it. If I wanted an animated Dolphin - I should call him - otherwise he wasn't interested. It is desirable to know as much as you can about the company your sending the reel to - or meeting with, but genuine original work, and a good attitude are the most vital.
10. Be honest
Do not claim to have done work you didn't do. I once used a freelancer to do a small amount of particles - we were full up - so we outsourced this one element, a year later this guy sat with in a director's office and explained that they had done the whole job - everything - himself, - this director let him go on for 5 minutes and then cut him off by commenting that it was funny but when he was personally directing this spot he never met this guy... needless to say that cut the meeting short. Never claim to have done work you didn't and don't claim to know things you don't, people can sense these lies a mile away and you'll never be trusted again. I once had a guy tell me he knew everything - I mean everything about particles in flame, as we were in the flame suite I innocently spun around and started building a set up in action and invited him to explain further. He went white and confessed that actually he'd seen it demoed once and not much more, - to this day I feel badly for the guy - but that is what happens.
One last point if you have the resources -- log every reel that goes out. Note on paper or in a database what was on that reel, - when you call that client back a year later and someone says that they think they already have your reel - you'll be able to explain that while the reel they have has X, Y and Z on it - it does not have A & B - which your really keen to show them, - this will impress them as you remember exactly what you gave them so well and it will allow you to re visit and remind them of your skills and talents. If you keep an accurate history reel, you can easily make new reels- if you don't then putting a reel together can be a nightmere of lost audio tracks, half finished tests and missed opportunities.
Every reel is different but the best ones are simple, stick in your head and are easy to find on your desk a week later.
Good luck.
CAREER TIPS
In this career series of tips we have dealt with several subjects for those people breaking into the industry, such as building a good show reel. In this tip we focus on how you should choose which facility to work at.
It may seem odd to think of rejecting a job offer, since most people would kill for any chance of just breaking in, but it is vital for your career that you quickly become selective. If you find yourself in the wrong sort of facility, then you should jump ship quickly. It is much easier to jump ship once you have some experience and a few professional spots on your reel... to pad out that one enormous experimental collage project.
It is more important to find the right culture at a facility your looking at. Far more important than the right pay, hours, conditions or promises. One can�t underline this single point too strongly, the company culture and atmosphere are more vital than any promises or otherwise that are made at the interview. It will determine how much you learn, what projects you work on and how happy you are.
What sort of range of cultures or structures do companies have? It appears that there are three basic models in the area of design, animation and post-production. The Star model, the Producer-Director team and the Team/crew approaches. It is vital to know how you work and how the prospective company works.
The Star model is based on facility equipment and stars. You build a big impressive suite, get a big impressive hardware box, and then you hire a post-production Star. You then sit them in the room and watch them pull a crowd. This individual is sometimes called a rainmaker, and will be paid a fortune. They are paid a major telephone number salary since they attract truck loads of work, - in this senario you are normally NOT this person � you just want to be this person someday, but for now you assist them. For a young person starting out, this seems attractive, �hey I get to work with THEM, and they�re a God�.. wow.. The difficulty comes from the fact that Gods don�t tend to be very generous with their time. Since they are a major Star � they act like one.. making your junior life fairly miserable. To make matters worse the company has no money left over after paying for the Star, his or her overseas trips, car space, expense accounts etc to be able to pay you much. It is the case that many people in the Star system hoard information and techniques. They think that while no one else knows what they do, that they will be unique and more valuable. Companies run along the star system are not generally fun relaxed places to work.. with all things there are exceptions, but this is not your best bet.
The next approach is the Producer/Director team. Now this sort of company has teams of producers with either lead animators, directors or visual effects supervisors. This can work extremely well, each couple is a separate unit and they build teams around them on a per job basis. The danger zones are if the company is owned by the senior creative � especially if they founded it. My advice here is to be careful, sometimes creative owners act like not just a kid in a candy store but a kid who owns a chain of candy stores. Quite often senior creatives set up their own company for more control � so as a junior you will have none. A very successful creative leader may have built the company on their style, making it the defacto �house style�. This is fine to learn from but you will soon be bored with only doing things someone else�s way. A major black spot is if the company is owned by a married couple, and they are also the only management. In this case my advice would be simple. Run. You will never know what is going on and you�ll never get promoted far.
The final type of company is a team approach � where people pool talent and ideas for a common objective of doing good work, and if you find a company like this � kill to work there. A team approach is no perfect solution, since everyone claims to support teams, and most rarely do, but they are exciting and amazing places to work. A good clue to a team based work environment is the level of staff turnover. A company with rapid turnover is a problem, so is actually a company with hardly any turnover, as this normally means a stale environment - a small amount of turnover is ideal, as people move up and on to better things - but generally there is heaps of loyality. The word team is over used but you�ll know it when you walk around the building. The whole place is busy and yet focused, with a sense of purpose. Team companies encourage, promote, and expand ideas.
Some feature film projects can be like this, and increasingly there is growing a new concept of a freelance crew. This is a team without a home, normally a loose crew of friends who are all excellent in their respective roles and who tend to move from project to project. As everyone knows everyone else - each tends to recommend the other for projects - so this crew just always seems to end up working together. As it is now possible to hire anything from flames to HD decks - such a crew can work almost independently of any one major facility, and most individuals tend to have their own personal high powered workstations. This final variation of the team environment is amazing to work in, - incredibly rewarding and almost impossible to artificially build. If you seek this style of work, you'll need to foster friendships with like thinking extremely talented individuals.
Sometimes you can break into such an environment by working for next to nothing on someone's personal short film - or low budget yet creatively brilliant film clip - just so people can get to know you and the quality of the work you do. You will fit in with some groups better than others, but don't forget to be really harsh with your assessment of the work being done. There is almost no benefit in working for free on a dud project, or attempting a great project with useless amateurs. (Remember the t-shirt slogan... 'Artists don't struggle - talentless hacks do!' ) But if you can fall in with a good crowd - pick and choose the right projects and find yourself in a supportive crew - it is one of the best professional work experiences you'll come across.
You will learn more in the right environment, it will present more opportunities and you'll be more likely to meaningfully work on complex projects. When the environment allows you to focus on the work, and work is challenging, - everything else - salary, car parking and catering all seem far less important.
It may seem odd to think of rejecting a job offer, since most people would kill for any chance of just breaking in, but it is vital for your career that you quickly become selective. If you find yourself in the wrong sort of facility, then you should jump ship quickly. It is much easier to jump ship once you have some experience and a few professional spots on your reel... to pad out that one enormous experimental collage project.
It is more important to find the right culture at a facility your looking at. Far more important than the right pay, hours, conditions or promises. One can�t underline this single point too strongly, the company culture and atmosphere are more vital than any promises or otherwise that are made at the interview. It will determine how much you learn, what projects you work on and how happy you are.
What sort of range of cultures or structures do companies have? It appears that there are three basic models in the area of design, animation and post-production. The Star model, the Producer-Director team and the Team/crew approaches. It is vital to know how you work and how the prospective company works.
The Star model is based on facility equipment and stars. You build a big impressive suite, get a big impressive hardware box, and then you hire a post-production Star. You then sit them in the room and watch them pull a crowd. This individual is sometimes called a rainmaker, and will be paid a fortune. They are paid a major telephone number salary since they attract truck loads of work, - in this senario you are normally NOT this person � you just want to be this person someday, but for now you assist them. For a young person starting out, this seems attractive, �hey I get to work with THEM, and they�re a God�.. wow.. The difficulty comes from the fact that Gods don�t tend to be very generous with their time. Since they are a major Star � they act like one.. making your junior life fairly miserable. To make matters worse the company has no money left over after paying for the Star, his or her overseas trips, car space, expense accounts etc to be able to pay you much. It is the case that many people in the Star system hoard information and techniques. They think that while no one else knows what they do, that they will be unique and more valuable. Companies run along the star system are not generally fun relaxed places to work.. with all things there are exceptions, but this is not your best bet.
The next approach is the Producer/Director team. Now this sort of company has teams of producers with either lead animators, directors or visual effects supervisors. This can work extremely well, each couple is a separate unit and they build teams around them on a per job basis. The danger zones are if the company is owned by the senior creative � especially if they founded it. My advice here is to be careful, sometimes creative owners act like not just a kid in a candy store but a kid who owns a chain of candy stores. Quite often senior creatives set up their own company for more control � so as a junior you will have none. A very successful creative leader may have built the company on their style, making it the defacto �house style�. This is fine to learn from but you will soon be bored with only doing things someone else�s way. A major black spot is if the company is owned by a married couple, and they are also the only management. In this case my advice would be simple. Run. You will never know what is going on and you�ll never get promoted far.
The final type of company is a team approach � where people pool talent and ideas for a common objective of doing good work, and if you find a company like this � kill to work there. A team approach is no perfect solution, since everyone claims to support teams, and most rarely do, but they are exciting and amazing places to work. A good clue to a team based work environment is the level of staff turnover. A company with rapid turnover is a problem, so is actually a company with hardly any turnover, as this normally means a stale environment - a small amount of turnover is ideal, as people move up and on to better things - but generally there is heaps of loyality. The word team is over used but you�ll know it when you walk around the building. The whole place is busy and yet focused, with a sense of purpose. Team companies encourage, promote, and expand ideas.
Some feature film projects can be like this, and increasingly there is growing a new concept of a freelance crew. This is a team without a home, normally a loose crew of friends who are all excellent in their respective roles and who tend to move from project to project.
Sometimes you can break into such an environment by working for next to nothing on someone's personal short film - or low budget yet creatively brilliant film clip - just so people can get to know you and the quality of the work you do. You will fit in with some groups better than others, but don't forget to be really harsh with your assessment of the work being done. There is almost no benefit in working for free on a dud project, or attempting a great project with useless amateurs. (Remember the t-shirt slogan... 'Artists don't struggle - talentless hacks do!' ) But if you can fall in with a good crowd - pick and choose the right projects and find yourself in a supportive crew - it is one of the best professional work experiences you'll come across.
You will learn more in the right environment, it will present more opportunities and you'll be more likely to meaningfully work on complex projects. When the environment allows you to focus on the work, and work is challenging, - everything else - salary, car parking and catering all seem far less important.
NATURAL RAIN in COMBUSTION
It is fast and easy to make "real-looking" rain in Combustion by using the built-in particle generator.....
First, create a project with a transparent layer of standard rain particles.
Next, to the entire layer, apply an unconstrained vertical blur.
Lastly, to give some excellent rain-depth feeling, COPY and PASTE the layer to multiple times. You create depth field feeling by simply changing the blur amount on each layer:
close up rain, medium rain, far away rain etc. To do this simply alter the blur value on each appropriate layer so it fits with whatever your shot, based on your focal point.
SHREK 3
Shrek is easily one the most successful animated franchises in Hollywood, with the first two films in the series taking in over $1.4US billion in box office receipts and selling over 90 million DVDs. The new film carries on this success based upon opening weekend numbers in the US and Canada, with an estimated $122US million box office opening.
Working on a series provides a lot of benefits for the artisans at PDI/Dreamworks as they are able to continually tweak the process to their advantage. Much of the staff has worked on all three films at PDI -- starting at the top with first-time Director/Writer Chris Miller and Co-Director Raman Hui. Not only can the crew revisit characters, but advances in technology also allow greater flexbility in creating effects to enhance the storytelling.
Lucia Modesto has a lot of history in the series, working on all three as Character Technical Director Supervisor, along with co-supervisor Larry Cutler on the last two films.
Head of Effects for Shrek the Third Matt Baer is also a longtime Shrekster, having worked as an effects animator on the first Shrek and an effects developer on the second film. Since the first film, fire has played big effects role in the series and the third is no different. What is different in this film is the role in which it plays and the way in which technology advancements have enabled it.

"On the effects side we were able to do more complex simulations," says Baer. "On the first film we had to be a lot more picky and not be able to use as large of a simulation or as complex of a simulation so with respect to fire on Shrek the Third we were able to use fluid dynamics...That in general has just become much more accessible to the artist where on Shrek 1 it would have been way to slow for the artist to deal with on a lot of different shots using that type of system."
Knowing that fire would be used on a much larger scale in the film, a lot of time was spent early on figuring out a balance between being able to coreograph the flames and keeping render times low. Another important aspect was how to accurately choreograph the flames for the story, yet keep render times at a minimum. In the end this was done by being able to actually dynamically resize the effects grid on a frame by frame basis to make it only as big as needed.
This enabled fire to be used to help tell the story in comedic ways throughout the film -- something that would have been unheard of before. For artists like Baer it was nice change from the more common atmospheric and other transparent effects that they are tasked with adding to scenes. "There is satisfaction in that," says Baer, "but it is so nice to be able to say 'oh my gosh people are actually going to see this...and I had to come up some really creative ways of hitting these non physical timings, so truthfully its great." It's not an easy process, as that while fire needs to act in realistic, physical ways often the timing of comedic effects must drive the animation.
The first steps in creating fire and other effects is to develop the base using fluid dynamics in Maya. This is used for most particles such as fire and gasses -- but PDI/Dreamworks has their own fluids simulator for actual fluids. Work is done in Maya because the application and UI have been developed over the years to make creating iterations easy and interactive for the artist. Lots of variations may be tried in a short amount a of time. Once the desired result is obtained, very little actual data is passed out of Maya -- in fact, as little as possible -- which is then fed into their proprietary pipeline and enhanced with in-house tools.
Magic is another hero of the effects department at PDI/Dreamworks -- and with each new Shrek installment there is call for variations that have never been seen before. "Part of the desire is to make something new so the audience sees a new type of magic, "says Baer. "so that's part another constraint as well...'you don't want it to look like any magic from any other movie and we don't want it to look like any other magic from the other Shrek movies but it still has to fit into the Shrek world..so there are these kind of loose guidelines."
To this end, the magic effects are very much in the eye of the beholder, so a lot of time was spent developing the looks. In fact, almost a third of time in creating the shot is spent experimenting with the look...talking about what the magic is and how it acts in the scene. As the process continues the artists are evenutally able to target into the final look. "It's fun but you really have to have a lot of endurance to work on one of those effects," says Baer. "You can't get your feelings hurt...you end up throwing away a lot of really great ideas."

Head of Effects Matt Baer

Co-Character Technical Director Supervisor Larry Cutler
 fxguide's John Montgomery 'on-set' at PDI/Dreamworks
Working on a series provides a lot of benefits for the artisans at PDI/Dreamworks as they are able to continually tweak the process to their advantage. Much of the staff has worked on all three films at PDI -- starting at the top with first-time Director/Writer Chris Miller and Co-Director Raman Hui. Not only can the crew revisit characters, but advances in technology also allow greater flexbility in creating effects to enhance the storytelling.
Lucia Modesto has a lot of history in the series, working on all three as Character Technical Director Supervisor, along with co-supervisor Larry Cutler on the last two films.
Head of Effects for Shrek the Third Matt Baer is also a longtime Shrekster, having worked as an effects animator on the first Shrek and an effects developer on the second film. Since the first film, fire has played big effects role in the series and the third is no different. What is different in this film is the role in which it plays and the way in which technology advancements have enabled it.

"On the effects side we were able to do more complex simulations," says Baer. "On the first film we had to be a lot more picky and not be able to use as large of a simulation or as complex of a simulation so with respect to fire on Shrek the Third we were able to use fluid dynamics...That in general has just become much more accessible to the artist where on Shrek 1 it would have been way to slow for the artist to deal with on a lot of different shots using that type of system."
Knowing that fire would be used on a much larger scale in the film, a lot of time was spent early on figuring out a balance between being able to coreograph the flames and keeping render times low. Another important aspect was how to accurately choreograph the flames for the story, yet keep render times at a minimum. In the end this was done by being able to actually dynamically resize the effects grid on a frame by frame basis to make it only as big as needed.
This enabled fire to be used to help tell the story in comedic ways throughout the film -- something that would have been unheard of before. For artists like Baer it was nice change from the more common atmospheric and other transparent effects that they are tasked with adding to scenes. "There is satisfaction in that," says Baer, "but it is so nice to be able to say 'oh my gosh people are actually going to see this...and I had to come up some really creative ways of hitting these non physical timings, so truthfully its great." It's not an easy process, as that while fire needs to act in realistic, physical ways often the timing of comedic effects must drive the animation.

)
The first steps in creating fire and other effects is to develop the base using fluid dynamics in Maya. This is used for most particles such as fire and gasses -- but PDI/Dreamworks has their own fluids simulator for actual fluids. Work is done in Maya because the application and UI have been developed over the years to make creating iterations easy and interactive for the artist. Lots of variations may be tried in a short amount a of time. Once the desired result is obtained, very little actual data is passed out of Maya -- in fact, as little as possible -- which is then fed into their proprietary pipeline and enhanced with in-house tools.
Magic is another hero of the effects department at PDI/Dreamworks -- and with each new Shrek installment there is call for variations that have never been seen before. "Part of the desire is to make something new so the audience sees a new type of magic, "says Baer. "so that's part another constraint as well...'you don't want it to look like any magic from any other movie and we don't want it to look like any other magic from the other Shrek movies but it still has to fit into the Shrek world..so there are these kind of loose guidelines."
To this end, the magic effects are very much in the eye of the beholder, so a lot of time was spent developing the looks. In fact, almost a third of time in creating the shot is spent experimenting with the look...talking about what the magic is and how it acts in the scene. As the process continues the artists are evenutally able to target into the final look. "It's fun but you really have to have a lot of endurance to work on one of those effects," says Baer. "You can't get your feelings hurt...you end up throwing away a lot of really great ideas."


Co-Character Technical Director Supervisor Larry Cutler
 fxguide's John Montgomery 'on-set' at PDI/Dreamworks
Subscribe to:
Comments (Atom)