1. Start by creating a Composite by opening your greenscreen and backplate footage in
Combustion.

2. Within that composite, go to File > New Composite.
3. Make sure your settings for the New Composite match the settings for the existing
composite:

4. In your Workspace panel, you should now see your new composite above your original:
5. Right-click on the new composite and choose "Import Footage" and bring in the same
greenscreen footage you did the first time:

6. Right-click on the duplicate greenscreen layer and choose Operators > Color Correction >
Brightness/Contrast; which will add this operator to your dupe layer:
Brightness/Contrast; which will add this operator to your dupe layer:

7. These are the settings I used in my Brightness/Contrast operator, though they may vary
depending on the quality and brightness of your greenscreen:
8. Double-click on your original composite to make sure that's what you're viewing in your
view panel:
depending on the quality and brightness of your greenscreen:
8. Double-click on your original composite to make sure that's what you're viewing in your
view panel:

9. Add a Discreet Keyer to your original greenscreen layer and go to the Set Up module in
the Keyer Controls. Look for the "Key In" section and click on the button next to "Source":
the Keyer Controls. Look for the "Key In" section and click on the button next to "Source":

10. In the resulting dialog box, select the Brightness/Contrast operator and click OK:

11. Make sure you set your Keyer Controls to "Result" and that your Brightness/Contrast
operator appears in the button next to Source: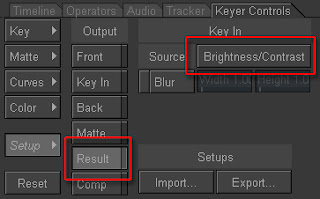
operator appears in the button next to Source:

From here, you should start working with the Keyer to pull your matte. This will vary from
shot to shot so I can't exactly walk you through that process. Remember, that my settings in
the Brightness/Contrast operator were based on the fact that the greenscreen was over lit.
You'll have to adjust your settings depending on how the greenscreen was captured in your
footage.
shot to shot so I can't exactly walk you through that process. Remember, that my settings in
the Brightness/Contrast operator were based on the fact that the greenscreen was over lit.
You'll have to adjust your settings depending on how the greenscreen was captured in your
footage.